From Cutting to Harvest: A Complete Guide to Growing Cannabis Clones ________________________________________
Introduction to Growing Cannabis Clones
From basic knowledge to the science behind growing a clone, this guide covers everything you need to know.
Cannabis clones are an increasingly popular way for growers to cultivate plants with consistency and efficiency. Whether you’re new or looking to refine your process, understanding how growing cannabis clones works can make a significant difference in your results.
A cannabis clone is a cutting taken from a mature plant and grown into a new, genetically identical plant. Because each clone comes from a “mother plant,” it carries the exact same traits—everything from potency and flavor to growth patterns.
Growers choose cannabis clones for a few key reasons: consistency, faster growth compared to seeds, and a simpler overall process. For many, using clones is the most reliable way to achieve predictable, high-quality harvests
What Are Cannabis Clones?
Cannabis clones are cuttings taken from a healthy, mature cannabis plant and rooted to grow into new plants. Since each clone is genetically identical to its mother plant, it will grow with the same characteristics.
The main difference between cannabis clones and seeds is predictability. Seeds can produce variation and may grow into male or female plants. A clone, however, will always be the same sex as the mother—typically female—making clones ideal for growers focused on bud production.
One of the biggest advantages of using clones is consistency. With cannabis clones, growers know what to expect in terms of cannabinoid content, yield, and growth patterns. Clones also skip the germination stage, saving both time and effort.
How Cannabis Clones Are Produced
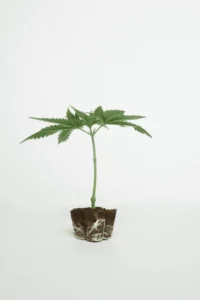
Creating cannabis clones involves taking a cutting from a healthy plant and encouraging it to develop roots. Growers typically select a strong branch, cut it at an angle, and place the clone into a growing medium such as soil, rockwool, or a cloning plug.
To increase success rates, many growers use rooting hormones to help the clone develop roots more quickly. The clone is then placed in a controlled environment with high humidity and stable temperatures to prevent it from drying out.
Environmental conditions are critical when propagating cannabis clones. Clones thrive in temperatures around 20–25°C, with high humidity levels between 70–90%, and low-intensity lighting. These conditions reduce stress and support healthy root development.
Timeline: Cannabis Clones vs Seeds
Cannabis clones have a shorter growth cycle compared to seeds because they skip germination and early seedling stages. Growing from clones can save 2–3 weeks, making them a faster option for many growers.
Benefits of Growing Cannabis Clones
Growing cannabis clones offers several advantages:
● Consistent quality: Every clone produces uniform results
● Faster growth: Clones skip early growth stages
● Known traits: Growers know potency, yield, and structure
● Beginner-friendly: No need to identify or remove male plants
Cannabis clones are ideal for growers who want predictable outcomes and efficient harvest cycles.
How Cannabis Clones Grow (Seedling to Harvest)
1. Rooting Stage (Clone Establishment)
When a cannabis cutting is first taken, it’s suddenly cut off from its root system, which puts it into a kind of survival mode. Internally, the plant shifts its energy away from normal growth and toward wound repair and root initiation. Cells at the cut site begin to divide and form a protective layer, and then develop into callus tissue. From that callus, certain cells are triggered—largely by plant hormones like auxins—to differentiate into root primordia, which are the earliest structures of new roots. This is why many growers use rooting hormone supplements at the cut site, as they provide or mimic these auxins and can help speed up and improve the consistency of root formation. During this time, the clone is still losing water through its leaves but has no roots to replace it, so it relies on stored moisture and a humid environment to stay hydrated.
As the process continues, those root primordia push outward and eventually break through the stem surface, becoming visible as tiny white root tips. Once that happens, the plant begins transitioning out of survival mode and back into active growth, because it can finally take up water and nutrients again through those new roots. At the same time, internal processes rebalance—transpiration increases, photosynthesis becomes more productive, and new leaf growth resumes. Essentially, the clone is reprogramming part of its stem tissue into an entirely new root system, and once that system is established, it functions like any other plant, just now on its own independent foundation.
This entire rooting phase is what happens behind the scenes when you buy clones—by the time they reach you, they’ve already formed those initial roots and are ready to continue growing in a more standard vegetative environment.
2. Vegetative Stage (Clone Growth Phase)
The vegetative stage is essentially the plant’s construction phase, where it stops focusing on establishment and begins building its long-term structure. Unlike the rooting stage, which is about recovery and survival, vegetative growth is outward expansion driven by a stable, functioning root system and consistent energy intake. At this point, the plant is no longer “figuring out how to live”—it’s scaling itself as large and structurally complex as conditions allow.
What defines this stage most clearly is architecture. The plant starts producing a repeating pattern of nodes and branches, and this structure is not random—it’s a response to both genetics and environmental signals, especially light. Strong, even lighting encourages compact, efficient growth, while weaker or uneven light causes the plant to elongate in search of better exposure. This is why vegetative plants can look either dense and bushy or tall and sparse depending on conditions, even if they’re the same genetics.
Internally, the plant is prioritizing the production of photosynthetic machinery. Leaves are not just “more foliage”—they are the energy engines that determine how fast everything else can happen. The more effective leaf canopy the plant builds, the more energy it can generate, which directly feeds further growth. This creates a compounding effect: more leaves allow faster growth, which produces more leaves, until limited by environment or container size.
A key difference from earlier stages is that resource allocation becomes directional and strategic. The plant begins deciding where to invest growth—upper growth is driven by apical dominance, while lower nodes remain dormant or develop into lateral branches depending on conditions. Growers often influence this by shaping the plant, which changes how energy is distributed without changing the plant’s biology itself.
Another defining feature of vegetative growth is that it is highly responsive rather than fragile. The plant can recover quickly from pruning, training, or environmental adjustments because it is in a high-repair, high-growth mode. Instead of simply maintaining itself, it actively rebuilds and reorganizes structure in response to changes.
By the end of the vegetative stage, the plant is no longer just larger—it is architecturally complete. The framework of branches, leaf sites, and energy capacity is in place, and the plant has effectively built the “hardware” it will use for flowering.
3. Flowering Stage (Bud Production)
The flowering stage is the plant’s shift from building structure to reproducing. Where vegetative growth is about expanding size and capacity, flowering is about redirecting that stored energy into developing reproductive sites and eventually producing mature flowers. This transition is triggered primarily by changes in light cycle, which signal to the plant that the season is shifting and it should begin its reproductive program.
Once flowering begins, the plant undergoes a noticeable internal reallocation of resources. Growth at the tips slows down or changes character, and energy is redirected toward specific nodes where flower sites develop. These early structures start as small clusters of growth that gradually become more defined over time. Instead of producing new branches and leaves at full speed, the plant begins prioritizing density, structure, and the development of reproductive tissues.
One of the most important changes during this stage is hormonal. Levels of flowering-related signals increase while vegetative growth hormones decrease in influence. This shift is what causes the plant to stop focusing on vertical expansion and instead concentrate on flower formation. Internally, the plant is now optimizing for successful reproduction rather than continued size increase.
As flowering progresses, the plant’s nutrient and water behavior also changes. Demand for phosphorus and potassium becomes more prominent compared to the vegetative stage, because these elements are heavily involved in energy transfer and flower development processes. At the same time, overall nutrient uptake becomes more sensitive—small imbalances can show up more clearly in leaf condition or flower development than they would during veg.
Structurally, the plant often goes through a brief period of rapid stretching early in flowering, where it continues to gain height before settling into focused flower production. After this phase, growth slows above the canopy and shifts almost entirely into developing dense flowering sites. Leaves may also change in appearance and function, becoming more focused on supporting nearby flower development rather than driving overall growth.
As flowers mature, the plant gradually transitions from building to ripening. Energy shifts away from expansion and toward resin and compound production, and the structures become denser and more defined. This is the final stage of the plant’s life cycle, where everything it has built—from roots to canopy—is directed toward producing mature, fully developed flowers before senescence begins.
Overall, flowering is not just “more growth with buds,” but a full biological pivot. The plant stops acting like a construction system and starts acting like a reproductive system, reorganizing how it uses energy, hormones, and structure to complete its life cycle.
Using Stress Training to Promote Growth (Auxins Explained)
Stress training is a group of controlled techniques used during vegetative growth to subtly influence how a plant develops its structure and distributes energy. Instead of allowing a single dominant top to take over, growers apply light, intentional stress—such as bending stems or redirecting growth tips—to shift how the plant responds hormonally. This taps into the plant’s natural ability to adapt to physical change by redistributing growth signals, which encourages more side branching and a more even canopy.
The key idea is not damage, but controlled disruption. When a plant perceives a change in its orientation or growth pattern, it adjusts by promoting growth in other areas. Over time, this can lead to a fuller, more efficient structure, with improved light penetration throughout the plant and a stronger overall framework, since multiple growth sites are encouraged rather than one main stem dominating everything.While it may sound counterintuitive, experienced growers use stress training to promote stronger, more vigorous growth. This works because of how plants naturally respond to stress through internal hormones, especially auxins.
Auxins are plant hormones that regulate growth and are most concentrated in the tips of the plant, a phenomenon known as apical dominance. In a cannabis plant, this concentration of auxins at the top is why the main cola typically grows taller and more dominant than the lower branches.
By applying specific training techniques, growers can influence the distribution of these hormones throughout the plant. This reduces apical dominance and encourages more even growth, resulting in multiple strong top sites instead of a single primary one.
Common Ways Growers Use Stress to Increase Growth
Topping
Topping involves cutting off the main growing tip of the plant. This interrupts apical dominance and forces the plant to redirect auxins to lower branches.
As a result two (or more) new main tops form, this forces the plant to grow bushier instead of taller, and also promotes more bud sites to develop.
Low-Stress Training (LST)
Low-stress training involves gently bending and tying down branches to create a flatter canopy, this exposes more of the plant to light and redistributes auxins more evenly across all growth tips.
Benefits include, more uniform growth, and better light penetration which can increase overall yield potential.
Super Cropping
This is a higher-stress technique where experienced growers carefully pinch and bend stems without breaking them completely.
The plant responds by reinforcing the damaged area, often creating a stronger branch and improving nutrient flow.
Lollipopping
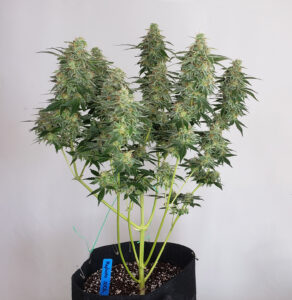
Lollipopping isn’t a stress training technique, instead it is a pruning technique used when growing to improve yield and bud quality. It involves removing the lower growth on a plant—small branches and leaves that don’t receive much light—so the plant can focus its energy on the top colas.
The name comes from the plant’s final shape: a bare lower stem with a full, round canopy on top, resembling a lollipop.
Why This Works
When a plant experiences mild, controlled stress, it activates survival responses. One of those responses is adjusting hormone distribution, including auxins, to support recovery and continued growth.
Instead of focusing all energy on a single top, the plant begins to spread growth hormones more evenly throughout the plant, strengthening stems and branches increasing overall structure and productivity.
Important: Stress vs. Damage
The difference between stress and damage in plant training really comes down to whether the plant is being signaled to adapt or forced to repair a failure. Stress is a controlled, temporary disruption where the plant’s tissues remain intact and functional. It still has full vascular flow, continues photosynthesizing, and can quickly reorient its growth in response to the change. In these cases, the plant interprets what’s happening as an environmental shift—like wind, shading, or directional pressure—and responds by adjusting its growth pattern, often strengthening certain areas or redistributing growth more evenly.
Damage, on the other hand, occurs when that structural integrity is broken. This could mean torn tissue, snapped stems, or severe wounds that interrupt the flow of water and nutrients through the plant’s vascular system. Instead of adapting, the plant is forced into a repair-focused response, where energy is diverted away from growth and into healing and survival. This slows development and can create weak points or stunted areas that don’t fully recover their original function.
A useful way to think about it is that stress is something the plant can “learn from,” while damage is something it has to “fix.” Controlled stress nudges the plant’s natural growth responses in a useful direction, whereas damage overwhelms those systems and temporarily halts normal development.
4. Flushing Stage (Pre-Harvest Preparation)
Flushing is the final phase before harvest where the plant is given only plain water (or a very low-mineral solution) so that excess nutrients in the growing medium are gradually reduced. The goal is to stop adding new fertilizers and allow the plant to finish relying on what it has already stored internally. Over the last stage of flowering, this helps bring the root zone back to a more neutral state and prevents continued uptake of extra minerals when the plant is already transitioning into natural ripening.
As this happens, the plant continues its normal finishing process and begins drawing more heavily on nutrients stored within its own tissues. This is why leaves often fade or yellow toward the end—it reflects internal nutrient redistribution as the plant winds down active growth and focuses on final flower development. In simple terms, the plant is no longer “feeding forward” from the medium as much, and instead is completing its cycle using internal reserves.
Many growers also use flushing because it’s believed to improve the final quality of the dried product, particularly in terms of how cleanly it burns after curing. The idea is that by reducing excess nutrients in the growing medium during the final phase, there is less residual material left in the plant that could contribute to a harsher smoke. While results can vary depending on growing method and conditions, this practice is widely used as a way to support a smoother finishing process and a more consistent final cure.
5. Drying Stage (Post Harvest)
Drying is the critical bridge between harvesting cannabis plants and properly curing them, and it plays a major role in the final quality of the product. After harvest, the plant still contains a significant amount of moisture, and drying gradually reduces this water content to prevent mold, stabilize cannabinoids like THC and CBD, and preserve terpenes, which are responsible for aroma and flavor. In many ways, this stage sets the foundation for everything that follows, because if it is rushed or done incorrectly, you can lose potency, aroma, and smoothness before curing even begins. Think of drying as the process that stabilizes the plant material, making it ready for the slower refinement that happens during curing. There are also several different ways to approach drying, and the method you choose often comes down to personal preference and your specific setup.
Hang Drying (the classic method)
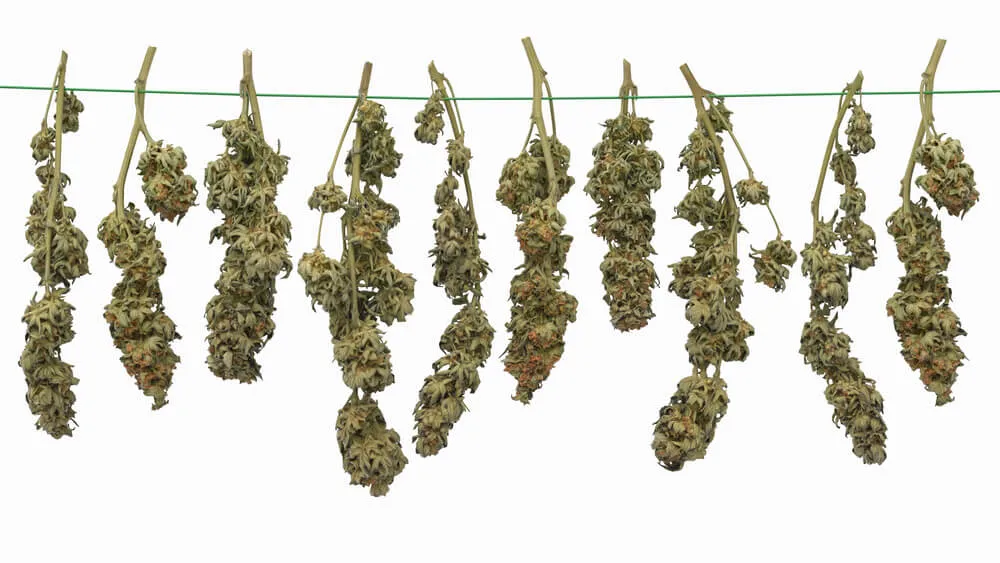
Hang drying is the most traditional and widely used method of drying cannabis, where harvested branches or whole plants are suspended upside down in a controlled environment to dry slowly over time. This position allows moisture to naturally travel from the thicker stems and buds outward, promoting a more even and gradual drying process. The goal is to create a stable environment with moderate temperatures, gentle airflow, and controlled humidity so the plant dries uniformly rather than drying too quickly on the outside while remaining wet inside. During this time, the plant continues to undergo internal breakdown of chlorophyll and other compounds, which helps reduce harshness and improve overall smoothness later on. Proper airflow is important, but it should be indirect rather than directly hitting the flowers, as too much air movement can overdry the surface and trap moisture inside. Over several days to a couple of weeks, depending on conditions, the plant gradually reaches a point where the smaller stems begin to snap rather than bend, signaling that it is ready for curing.
Rack Drying (aka screen drying)
Rack drying is an alternative method where cannabis buds are placed on horizontal drying racks instead of being hung, allowing air to circulate around individual pieces from multiple angles. This approach is often used when space is limited or when plants have been trimmed down into smaller buds right after harvest. By spreading the material out in a single layer, rack drying helps ensure that each bud is exposed to consistent airflow, which can lead to a more uniform dry if managed correctly.
The process still relies on the same environmental principles as hang drying—moderate temperatures, controlled humidity, and gentle air movement—but the physical setup changes how moisture leaves the plant. Because buds are resting on a surface rather than hanging, it’s important to rotate or reposition them occasionally to prevent flattening or uneven drying where contact points touch the rack. Airflow becomes especially important here, as stagnant air beneath or around the buds can increase the risk of uneven moisture retention.
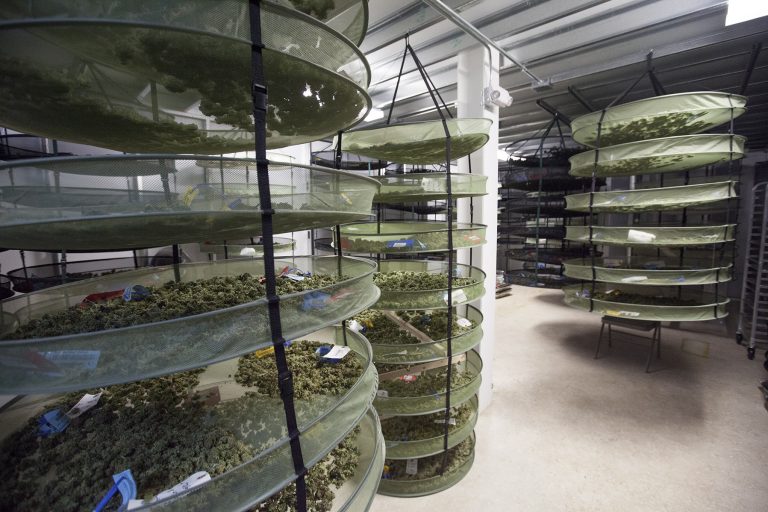
Rack drying can be slightly faster than hang drying depending on conditions, since more surface area is exposed at once, and there is no large stem to redistribute moisture. Because of this, it also requires closer monitoring to avoid overdrying the outer layers while the inner material is still finishing. When done properly, it offers a practical and efficient way to dry smaller harvests or densely trimmed material while still preserving quality for the curing stage that follows.
Whole Plant Drying
Whole plant drying is a method where the entire cannabis plant is harvested at the base and hung intact, rather than being broken down into individual branches or trimmed before drying. In this approach, the plant is typically inverted and left to dry as a single structure, which allows moisture to move more slowly from the larger stalks and branches into the buds. This slower internal moisture migration can create a more gradual and often more forgiving dry, especially in environments where controlling conditions precisely is important.
Compared to standard hang drying—where branches are usually separated to increase airflow and speed up the process—whole plant drying retains more of the plant’s internal moisture buffer. This can help reduce the risk of the outer buds drying too quickly while the inner parts remain wet, since the larger plant structure acts as a kind of moisture reservoir. However, because the plant is denser and less exposed, airflow management becomes even more important to prevent stagnant pockets of humidity forming inside the canopy.
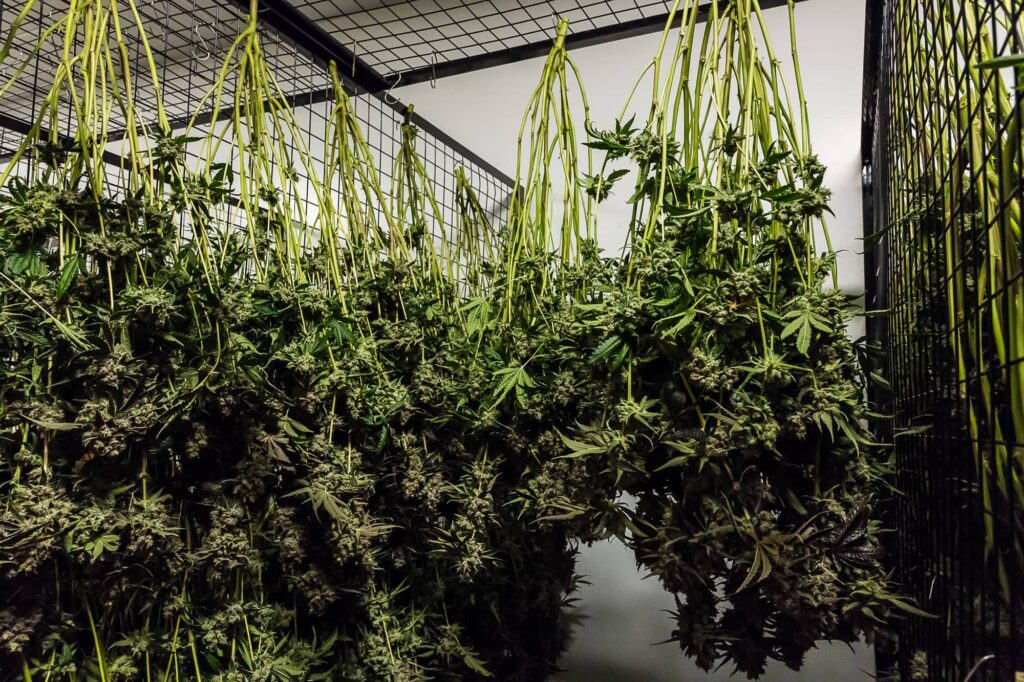
The main trade-off is speed and control. Whole plant drying tends to take longer and requires more space, but it can produce a slower, more even dry if conditions are stable. Hang drying individual branches, on the other hand, offers more flexibility and faster drying times, but may require more attention to prevent uneven results. Both methods aim for the same end point—a slow, controlled moisture reduction that preserves quality for curing—but they differ in how much structure is kept intact during the drying phase.
5. Curing Cannabis Clones
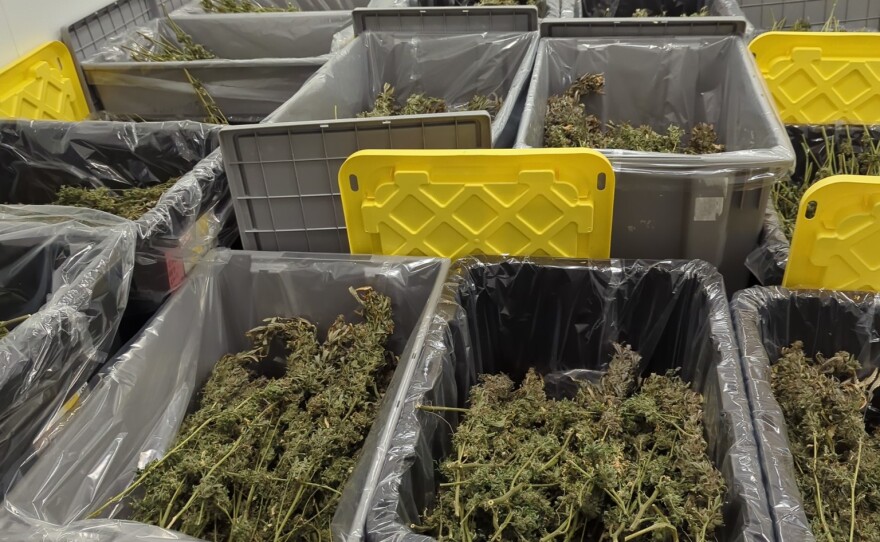
After the initial drying phase, cannabis enters curing, which is a slower, controlled aging process designed to refine quality rather than simply remove moisture. While drying primarily reduces water content to make the buds stable and mold-safe, curing allows the internal chemistry of the plant to continue evolving in a sealed, controlled environment. During this time, residual moisture redistributes from the inner parts of the buds outward, and natural breakdown processes continue—most notably the gradual degradation of chlorophyll, which helps reduce harshness and improve smoothness.
Curing also plays a key role in stabilizing the plant’s chemical profile. Cannabinoids like THC and CBD become more consistent, and terpenes—responsible for aroma and flavor—are better preserved when the environment is kept cool, dark, and properly balanced. Instead of being exposed to open air like in drying, the buds are stored in sealed containers where their internal environment can slowly equalize, allowing flavors and aromas to develop more fully over time rather than being lost too quickly.
A central part of curing is the process known as “burping.” This involves periodically opening storage jars to release built-up moisture and allow fresh air exchange. Even after drying, moisture can still be trapped in the center of buds, and sealing them immediately can create a humid microenvironment. Burping helps prevent mold by releasing excess humidity while also gently replenishing oxygen, which supports a slow, controlled curing process. Over time, burping becomes less frequent as moisture levels stabilize.
Typically, curing takes around 2 to 4 weeks at a minimum, though many growers extend it longer for further refinement. The process is gradual, but it’s where much of the final quality is actually developed—transforming dried cannabis into a smoother, more aromatic, and more balanced final product. For optimal consumption, the relative humidity inside properly cured storage is generally kept around 58–62%, which helps preserve terpene quality while maintaining a smooth burn and preventing the buds from becoming either overly dry or too moist.
Growing Tips for Cannabis Clones
Environment
Getting the indoor environment right is what separates “it grows” from “it thrives.” Think of it as building a stable climate where the plant can consistently convert light into growth without stress or bottlenecks. When any one factor swings too far—temperature, humidity, airflow—the plant slows down, even if everything else is dialed in.
Temperature is the backbone. During the vegetative stage, cannabis generally performs best somewhere in the low-to-mid 20s °C, with a slight drop at night. That day–night difference helps maintain normal metabolic rhythms without shocking the plant. If temperatures climb too high, growth can become airy and stressed; too low, and everything slows, including nutrient uptake. What matters just as much as the absolute number is stability—frequent swings are harder on the plant than being slightly off ideal.
Humidity works hand-in-hand with temperature. Younger plants prefer higher humidity because they take in a lot of water through their leaves, while more mature vegetative plants do better as humidity gradually comes down. This balance is often described through vapor pressure deficit (VPD), which is just a way of saying the air should encourage steady transpiration without pulling too much moisture out of the plant. If the air is too dry, the plant loses water too quickly and can stress; too humid, and it struggles to transpire and becomes more vulnerable to mold or slow growth.
Airflow is another piece people underestimate. You want constant, gentle movement of air around the leaves—not strong enough to whip them around, but enough to prevent stagnant pockets. This helps strengthen stems, regulate leaf temperature, and reduce the chance of pests or mildew taking hold. An exhaust system that regularly replaces the air in your grow space is just as important, because plants quickly use up available CO₂ in a sealed environment. Bringing in fresh air keeps photosynthesis running efficiently.
CO₂ itself is rarely something beginners need to supplement, but it’s worth understanding. In a normal indoor setup with decent air exchange, ambient CO₂ levels are enough. Supplementation only really becomes useful when everything else—light intensity, nutrients, temperature—is already optimized. Otherwise, it doesn’t do much.
The root environment matters just as much as the air. Good drainage and oxygen in the root zone are critical, which is why overwatering causes so many issues. Roots need access to oxygen to function properly; constantly saturated soil limits that and slows growth. Letting the medium dry slightly between waterings encourages roots to expand and keeps them healthy.
Cleanliness and consistency round everything out. Indoor grows are controlled environments, so small problems can spread quickly if ignored. Keeping the space clean, monitoring for pests, and sticking to a steady routine with watering, feeding, and light cycles makes a big difference over time. Plants respond best when conditions don’t swing unpredictably.
When all of these pieces line up—stable temperature, balanced humidity, steady airflow, and a healthy root zone—you create an environment where the plant doesn’t have to “fight” anything. That’s when you start to see fast, vigorous growth and a structure that sets you up for a strong flowering phase later.
Lighting
Lighting is the engine of an indoor grow—nutrients and watering only matter as much as the plant has enough light to actually use them. During the vegetative phase, cannabis prefers long days and relatively intense light, but there’s a balance between giving it enough energy to grow quickly and not overwhelming it.
Most growers keep lights on for about 18 hours a day and off for 6, which gives the plant plenty of time to photosynthesize while still allowing a short rest period. Some people push closer to 20 or even 24 hours of light, but the gains tend to be marginal compared to the extra electricity and potential stress. The key is consistency—plants respond best when the light schedule doesn’t fluctuate dramatically.
In terms of intensity, what you’re really aiming for is enough light to drive strong growth without causing stress. Modern LED grow lights have made this easier because they’re efficient and produce less heat than older HID setups. For vegetative growth, a moderate-to-high intensity works best—strong enough that the plant grows compact and bushy rather than tall and stretchy, but not so strong that leaves start to curl, bleach, or show signs of light stress.
Distance from the canopy matters just as much as the strength of the light itself. Too far away and the plant stretches trying to reach it; too close and you risk light burn or heat stress. Most LED manufacturers give recommended hanging heights, but as a rough idea, seedlings need the light higher and gentler, while established vegetative plants can handle it closer and more intense. Watching the plant is more reliable than any fixed number—upright, slightly angled leaves (“praying”) usually mean the light level is in a good range.
Spectrum also plays a role. During vegetative growth, cannabis responds well to a light spectrum that leans toward blue wavelengths, which encourages tighter node spacing and leaf development. Many full-spectrum LEDs already provide a balanced mix, so you don’t usually need to overthink this unless you’re using specialized equipment.
Uniform coverage is another factor people underestimate. It’s not just about how strong the light is directly under the fixture, but how evenly it spreads across the entire canopy. Uneven lighting leads to uneven growth, with some plants or branches thriving while others lag behind. Adjusting plant positions or training them to create a flat, even canopy helps make better use of your light.
Finally, lighting ties directly into everything else—more light means the plant can use more water and nutrients, but only if temperature, airflow, and CO₂ are also in a healthy range. If one of those factors is limiting, simply increasing light won’t help and can actually stress the plant. The goal is to keep everything in balance so the plant can steadily convert light into growth without hitting bottlenecks.
Watering
Watering is one of the easiest things to get “almost right” and still limit your results. The goal isn’t just to give the plant water—it’s to manage the balance of moisture and oxygen in the root zone so roots can breathe, expand, and efficiently take up nutrients.
A healthy watering rhythm usually follows a wet–dry cycle. You water thoroughly, then allow the medium to dry down to a point where the roots are getting plenty of oxygen before watering again. That drying phase is important—it encourages the roots to grow outward in search of moisture and prevents the stagnant, low-oxygen conditions that lead to slow growth or root issues. Constantly keeping the soil wet is one of the most common mistakes and tends to produce droopy plants that never really take off.
When you do water, it should be deep and complete rather than frequent and shallow. The idea is to fully saturate the root zone so all roots have access to moisture, then let gravity pull excess water out through drainage holes. That runoff helps prevent salt buildup from nutrients and ensures you’re not just wetting the top layer while the lower roots stay dry. In larger pots especially, partial watering can create uneven root development.
Timing depends on the plant size, pot size, and environment. A small plant in a large pot can go quite a while between waterings because there’s more soil holding moisture than the plant can use. As the plant grows and fills out the container, it will start drinking much faster. Instead of watering on a fixed schedule, it’s better to read the plant and the pot—lifting the container to feel its weight is a simple and reliable method. Light pot means it’s time; heavy pot means wait.
Water quality and pH also play a role. Even if your nutrients are correct, improper pH can lock them out. In soil, keeping water around a slightly acidic range allows nutrients to remain available. If you’re using tap water, it’s sometimes helpful to let it sit for a while before use to dissipate chlorine, depending on your local supply.
Another subtle factor is watering speed. Pouring too quickly can cause water to channel down the sides of the pot and out the bottom without fully soaking the soil. Slower watering in stages—adding a bit, letting it absorb, then continuing—leads to more even saturation.
Right after transplanting, watering needs a bit of adjustment. The new pot holds more moisture than the plant is used to, so it’s easy to overdo it. At that stage, it’s often better to water around the root zone rather than soaking the entire container immediately, then gradually expand as the roots grow into the new space.
As the environment and lighting intensity increase, the plant will naturally use more water. That’s why watering, nutrients, and lighting are all connected—more light drives more growth, which increases water uptake, which in turn affects how often and how much you feed. When everything is balanced, you’ll notice the plant drinking consistently, leaves staying perky, and growth remaining steady without the swings that come from over- or under-watering.
Nutrients
During the vegetative (“growing”) phase, cannabis is primarily focused on building stems, branches, and leaves, so its nutrient demand is heavily skewed toward nitrogen. That doesn’t mean the other elements aren’t important—they absolutely are—but nitrogen is the driver of that lush, green, vigorous growth you’re aiming for.
Most growers use a base nutrient with an N-P-K ratio that leans higher in nitrogen, something like 3-1-2 or similar. Nitrogen supports chlorophyll production and overall leaf development, phosphorus helps with root expansion and energy transfer, and potassium plays a big role in overall plant health and structure. Even in veg, you don’t want to ignore phosphorus and potassium, just keep them secondary to nitrogen.
Beyond the main three, the secondary nutrients—calcium, magnesium, and sulfur—matter more than people often expect. Calcium helps build strong cell walls and prevents structural issues, magnesium is central to photosynthesis (it’s literally part of the chlorophyll molecule), and sulfur supports enzyme function and overall metabolism. If you’re using filtered water, reverse osmosis, or coco-based media, supplementing with a cal-mag product is often necessary because those mediums don’t provide much on their own.
Micronutrients like iron, manganese, zinc, copper, and boron are needed in very small amounts but are still essential. Most complete nutrient lines include these already, so unless you’re seeing deficiencies, you usually don’t need to add them separately.
Feeding strength is where restraint pays off. It’s generally better to start at about a quarter to half of the recommended dose and increase gradually while watching the plant’s response. Dark green leaves and burnt tips usually mean you’ve gone too far, while pale or slow growth can indicate underfeeding. Cannabis tends to be more forgiving of slight underfeeding than overfeeding.
Frequency depends on your medium. In soil, many growers alternate between feeding and plain water to avoid buildup, whereas in coco or hydro setups, nutrients are often given more consistently at lower concentrations. Either way, maintaining proper pH is critical—around 6.0–6.5 for soil and slightly lower for coco/hydro—because even perfectly mixed nutrients won’t be absorbed if the pH is off.
One thing that’s often overlooked is how nutrients tie into transplanting. After moving a plant into fresh soil, that soil usually already contains some nutrients, so it’s wise to go light on feeding for several days. Let the roots settle and start exploring before pushing growth aggressively.
Transplanting / Upsizing Pots
Transplanting cannabis is really about timing and gentle handling more than anything complicated. You want to move the plant once the roots have filled out the current container but before they start circling heavily and choking themselves. A good cue is when the plant dries out quickly or you see roots poking from the drainage holes—at that point it’s ready for more space. Instead of jumping straight into a very large pot, it’s better to step up gradually, since too much unused soil holds excess moisture and can slow root development or lead to overwatering issues.
Before you start, prepare the new pot with lightly moistened soil and make a hole about the size of the existing root ball. Water the plant a little beforehand so the soil holds together, but don’t soak it—wet soil falls apart and dry soil crumbles. When removing the plant, support the base of the stem with your fingers, turn the pot upside down, and let gravity do most of the work. The goal is to keep the root mass intact. If the roots are slightly bound, you can gently loosen the outer edges, but avoid tearing into them unless they’re tightly wound.
Place the plant into the new container at the same depth it was growing before, or slightly deeper if it stretched. Fill in around it with soil and press lightly just enough to remove large air gaps without compacting everything. After that, give it a thorough watering until you see some runoff, which helps settle the soil around the roots. For the first day or two, it helps to keep conditions stable and not overly intense—strong light or heat right away can add unnecessary stress while the roots adjust.
Most plants will pause growth briefly after transplanting, which is normal. As long as the environment stays consistent and you don’t overwater the larger volume of soil, they typically bounce back quickly and start growing more vigorously once the roots expand into their new space.
Indoor vs Outdoor Growing for Cannabis Clones
Indoor growing is one of the most popular methods for cultivating clones because it gives growers full control over the plant’s environment. Instead of relying on natural conditions, everything from temperature and humidity to airflow and lighting can be carefully managed and kept consistent. This stability is especially valuable for clones, which are genetically identical and respond very predictably to their environment. By removing fluctuations like sudden weather changes or seasonal shifts, indoor setups allow plants to grow in a steady, low-stress environment where they can focus entirely on development.
One of the main advantages of indoor cultivation is the ability to fine-tune each stage of growth. Temperature can be kept within an ideal range to support steady metabolism, humidity can be adjusted depending on plant size and stage, and airflow can be directed to strengthen stems and prevent stagnant conditions. Lighting is also fully controlled, meaning growers can provide consistent daily cycles and optimal intensity without relying on sunlight availability. This level of precision helps reduce stress on clones, which are still developing their root systems and can be sensitive to environmental instability.
Because of this control, indoor growing often results in more uniform plants with predictable growth patterns and more efficient use of space. It also allows year-round cultivation, meaning growers are not limited by seasons. However, it requires more equipment, energy, and monitoring compared to outdoor growing, which is the trade-off for that level of precision.
Outdoor growing, by contrast, relies on natural sunlight and seasonal cycles, making it a more cost-effective and simpler approach. When conditions are right, outdoor environments can produce very large plants due to unrestricted root space, full-spectrum sunlight, and natural airflow. The sun provides an intensity and quality of light that is difficult to replicate indoors, which can contribute to strong overall growth when climate conditions are favorable.
However, outdoor cultivation is highly dependent on timing and geography. Temperature swings, rainfall, pests, and changing daylight hours all influence plant development, meaning growers must carefully align planting schedules with seasonal windows. For clones specifically, timing is critical because they need a stable early establishment period before being exposed to harsher outdoor conditions. If introduced too early or too late in the season, growth can be limited or stressed.
Ultimately, indoor growing prioritizes control and consistency, while outdoor growing emphasizes scale and natural efficiency. Both can produce high-quality results, but they require very different approaches to timing, planning, and environmental management.
Final Thoughts from Team Cannabis on Growing Cannabis Clones
Cannabis clones are one of the most efficient and reliable ways to grow cannabis, giving growers a strong head start with genetically identical plants that produce consistent, predictable results. By starting with clones instead of seed, you can shorten grow time, reduce variability, and streamline the entire cultivation process from rooting through to harvest.
Success with cannabis clones comes down to a few core principles. It begins with choosing healthy, vigorous clones that already show strong rooting potential and stable growth. From there, maintaining consistent environmental conditions is key—stable temperature, humidity, airflow, and lighting all work together to minimize stress and support steady development. Just as important is patience and consistency, allowing each stage of the plant’s life cycle to fully develop before moving on to the next.
When these fundamentals are in place, growers can significantly improve both plant health and final yield. Whether growing indoors or outdoors, success with clones ultimately depends on attention to detail and environmental stability. From the early rooting stage through vegetative growth, flowering, and curing, every phase plays an important role in shaping the quality of the final product.
With the knowledge from this guide, you’re well equipped to begin your journey with cannabis clones and confidently take your grow from cutting to harvest. If you’re ready to get started, we also have a dedicated blog explaining how you can order BC cannabis clones directly from us at Team Cannabis, making it easy to begin your grow with quality genetics from the start.
Interested in purchasing some clones? Check out our blog article to get the details on the ordering process!
Learn the rules and regulations of growing cannabis at home in Canada